Thursday 31 May 2012

Challenge of Literature big reveal day is here!

When Erin Prais-Hintz posted this challenge I knew, before I even finished reading, exactly what book I should design around.  It’s a children’s book by the name of Sandman in the Lighthouse by Rudi Strahl, illustrated by Eberhard Binder and translated & adapted (from the German) by Anthea Bell.  I’m sorry I don’t  have a link to add for you to buy this lovely, as it is out of print. 

Let me tell you a bit more about me to make give this selection some context.  I’m the youngest of four, with three older brothers.   Those of you at the end of the line, like me, can relate to the idea that nothing is the house is really yours, especially when it comes to the books.  There were many Richard Scarry books which were regular bedtime stories, but when one brother in particular would read me a story we always chose Sandman in the Lighthouse.  It certainly got to the point where it was just understood this would be the book.  Fast-forward twenty some odd years and I’m pregnant and weekly asking my parents to dig apart every bit of storage to find this book so I can read it to my own little one.  My mum insisting that she had already given it to me years before when they had moved.  I knew that wasn’t the case, but we’re both stubborn so the dance continued with me, every few months, saying “find it yet?” A night a couple of months ago I asked again and caught the smile on my brother’s face from across the room.  Yup, he had quietly taken the book himself long before I asked for it.  I really should have thought of that!  But at least with the location of the original known I was free to go ahead and find my own copy.  Sure enough, I found a copy of ebay in short order and it arrived on my doorstep the day before the Erin presented the challenge. 

The story itself is good, but frankly, reading it now I think I was much more attached to the artwork.  Perhaps most attached to the experience itself of sharing the story with my brother.  Here’s the rundown: the Sandman crashes his boat heading to the lighthouse to put little John to sleep. A shark eats his sand and he is stranded in the lighthouse while all the world’s children stay awake and look for him.  A pilot with a sharp eye spotted a signal that he was stranded and all the ships raced to save him, but the sea was still too rough.  The sailors tried to rescue him with a breeches buoy over a cable but the breeches were too big.  The clever pilot had a tailor parachute in to make the Sandman a new pair of breeches. Success! Off he went in his breeches on a cable over the sea to a cargo boat.  Once ashore we got a new supply of sand from the wind and went around the world putting all the children to sleep.
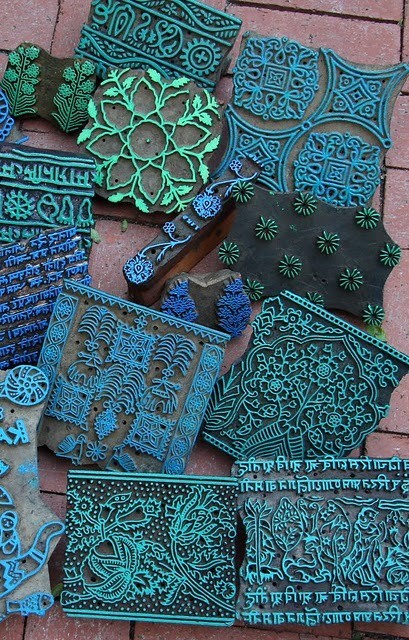
I had many an idea of how to capture the story.  Ultimately I decided a clean and simple approach would be most in line with the book.  I created polymer beads, with ultralight polymer as a base, and surface detail with alcohol ink.  Let me show you!
003
Now each of the beads represents a pattern from a part of the tale.  They are not in order above, nor in order in the necklace itself, which I’ll show you last.
011012_edited-1
First up is the rough sea bead.
007
Searching the Indian jungle for the Sandman.
010
The ships getting as close ad they can in the rough, dark waters.
017
Jack Tar contemplating the Sandman falling through the original breeches.
014016
Tailor to the rescue! These beads are his parachute and iron steam.
013
The last page, Sandman on his way.
It was a real challenge for me working in such a loose style with such clean colours but I’m very happy with the results! I kept the simple going by stringing this very long on cotton cord with a twist of silk.   I’m sorry for the last picture here, the daylight was long gone. I think this is will be finding the sun in many a summer outfit though. 

Thanks so much for stopping by and making it all the way through my story, about a story, about a story!
You can see all the other creations by following the links on Erin’s post as this rookie blogger has no clue how you add such a thing :)

**oops It looks like I also don't know how to schedule a post! Sorry to those who may have missed it, and many thanks to those who came back

But I'll take the chance to add a daylight shot

Wednesday 30 May 2012

Just one more

This is my substantially sized but lightweight house.  Again, I shifted the focus to that lone blue shutter.  This bead is made with a base of Ultralight polymer.  I have a love/hate relationship with that stuff.  I really don't enjoy manipulating it raw, but I can't help but love how you can go big without the downside of the weight.


More great big beads tomorrow!

Monday 28 May 2012

A Tangent, updated

Well I've gone off on a tangent as usual! That's not such a bad thing really, but it always seems to happen more often when a deadline is approaching. I should have remembered that the blog hop deadline is ahead of the end of the month, of course! So I'm going to use this post as a bit of a place marker so I can join in on the blog hopping fun, but I'm gonna kiss that deadline. Here's a sneak peek and the direction I ended up going, straight from the studio window, still raw.


Update - May 30th
I have one finished piece to show you.  I had hoped to get more of my pile of beads made into actually jewelry, but I've run out of time.  So, let's go back to the beginning of the process.  Here is the inspiration presented from Art Bead Scene

Italian's House at Monmarte by Maurice Utrillo
I have to tell you, this painting didn't speak to me right away.  So I started by mixing up colours without any real plan.  Hey it's meant to be a challenge right?  Living in Canada, I generally have the added challenge of only using what I have on hand since ordering supplies with the inspiration in mind is not likely to happen in time. So a pile of colour at the ready I spent a little more time, thinking on the piece.  I will admit I did find a connection, a point to bounce of from.  I love that the one shutter up top is blue instead of green.  I started thinking about the view from that window. What was special about it? Why the little twist?  I started dreaming of images with strong horizontals breaking up the image. Indeed I became fixated on the shutter.

Now, I almost made it all mud, when in my haste to get at the pattern I stacked my mokume gane in a different order than I had planned.  I had this nice pearly burgundy that was just leaning a little plum.  I liked it.  I moved my cream tone away noting I better put another shade between these two so I don't end up going into the pinks... Sure enough, you guessed it, I got caught up stacked 'em just as I was trying to avoid. 

Ah well, I decided long ago that any mistake in the studio is only a mistake if you let it stay that way.  So following Tim Gunn's infamous advice I made it work!


The polymer rectangles are my little version of windows full of a view broken up by shutter blades.  I made them in such a way that there is no back or front.  I brought in some wood, like you would find in a nice casement and then I created a t-shirt "chain" with the beads loosely knotted in.  There is no clasp as it stretches nicely over your head. 

I still have a whole pile more to get creating with. Please excuse the lighting on the following iPhone pics, it was that or nothing at all. 


I'm looking forward to seeing all the other creations based on this same inspiration. 


Saturday 26 May 2012

Strange days

The minutes are clicking down to 12:01 May 26. That's the moment I heard my daughter first scream.  I barely caught a glimpse of her as the nurse full on ran out the room with her.  My husband and I just stared at each other, mostly.  It was like every emotion I was experiencing I was also experiencing the flip side at the same time.  The series of events that brought us to that moment were from the mundane to the emergent.  I could write volumes really, but my head spins a bit with it all so I'll spare you the hyper detailed rant which is how I remember it.  

Averleigh showed up 10 weeks early and quite unexpectedly, as in I worked until 2 pm that day.  Not only was she early, but basically she had stopped growing probably several weeks before her birth.  I had almost no amniotic fluid left and she was the size of about 25-26 weeks, not the almost 30 weeks she should have been.  I was sick with nausea and vomiting my whole pregnancy but everything seemed fine with her the whole way until it suddenly wasn't.  It was as simple a thing as when I lay down to bed the night before her birth, she didn't do her normal kicking.  Instead it felt like she was turning a different way.  I had an OB appointment the next day so I thought, huh, I should probably mention that.  She didn't think much of it but suggested I go to the hospital if I wanted and just sit with a monitor for a bit and make sure everything was fine.  So I did. What was supposed to be 20 minutes, turned into an hour, then "a little while longer" then... we've booked an ultrasound.  That became here's a steroid and an ambulance to take you to a hospital with a level 3 NICU.  By the time I was hooked up there I could really hear the monitor, I could really hear the gaps where there was no heartbeat.  Within the hour I was having an emergency Cesarean. 

Then time dragggggged like never before.  I had to listen to someone else giving birth and joyously celebrating the arrival for over 2 hours, in the room next door.   Then I was moved and told to get some rest. Uh yeah sure.  I didn't sleep for one second.  I didn't get to speak with Averleigh's nurse, by phone, until about 10 am.  Now that is torture.  The 56 day hospital stay that started that day was no picnic either and again I could write volumes.  There would be way more swearing than is probably appropriate too. 

Hm, I've got 1 minute left.  Think I'll end here to say I gotta get some sleep since there is a little girl who will be celebrating being 2 tomorrow and I couldn't be happier about that!

Saturday 19 May 2012

A Beautiful Day!

It was such a beautiful, sunny day today.  We're getting more of the same for the rest of the holiday weekend.  We started the day with a local neighbourhood garage sale and spent the rest of the day scrubbing our finds clean.  I tried to fit in an outdoor photo shoot, but ended up a bit rushed.  The sun was so hot the camera was heating up and I was starting to worry about the polymer getting too hot.  But even moving quickly I didn't get everything shot before nap time came to an end.  It seems someone else was eager to get back in the sun.


I think this is my favourite shot of the day.  Still working on getting a set up I like.  This shooting outside routine means great light but it's a bit of a gamble since with the strong sun overhead the screen is mostly reflection. So for the most part, I shoot away just based on when my focus cross hair lands where I like.

From my work table


I'm going to attempt a blog post from my phone and see how that goes.
- yeah, I'm not savvy enough for that yet!
A couple days ago Heather Powers posted this stunning pin. Oh how I covet those large scale wood blocks!

So of course it came as no surprise when she posted today about making new beads inspired by Indian wood blocks. Her sketches alone get my eyes dilating, I just can't wait to see the full effect.
This all got me very excited since I have a little test bead in its experiment stage. You see, I've never used oil before on polymer. The product itself says it can be used on plastic and the news on glass attic seems to back that up also. But since it was new to me I wanted to give a full 30 days curing to have that extra confidence.
Several years ago I came across this is little collection, which I found at a street fair in Kingston, ON.   I only wish she had had a bit more selection as I cleaned her out of every style she had.

They look pretty and all on the shelf, but it was really time to see what they could do.  So first, I made some moulds:

Here’s a peek at my little stash of experiments

The Shiva oil is so nice to work with.

It would be really fun to go all out and try a dense pattern like the border on the sari I use as a curtain. I had to look in about 20 shops before finding one with silver rather than gold.


Still on the go are my plans for the two challenges I’m participating in this month.  I think I have a plan for each now. Well, more like yet another plan which I think I’m happiest with until another idea comes to invade.

The push is on though to get moving on these as my little girl turn 2 on the 26th and there is much to do to mark the day.

Sunday 13 May 2012

Remembering to care for those tools

A few nights ago I sat down with two pieces of inspiration. A couple of starting points for pieces for not one, but TWO challenges this month. I like to get rolling by mixing up my favourite colour of the palette and work up from there, so I'll have clay at the ready for ideas.  I didn't get very far with that since I was distracted by a little mess and remembered I had a little test experiment underway that I could move on to the next step with.  So happy for the distraction, I grabbed that clay that I had coated with a few different brands and weights of nice quality acrylics to start running it through the good ol' pasta machine.  As I work my way down the size, one brand wasn't crackling at all, seemingly just stretching out... and then...next pass, that paint decided to curl up on itself!  Yup, a few cranks too many and I new I had just clogged up my machine with acrylic - there was colourful clay, and colourful language. 

Then I got to thinking, when was the last time I cleaned this pasta machine? Pretty sure the answer was never.  Off I went to see if I could find the instructions I'd used before to disassemble and clean my other machine, but no joy.  (I did find a youtube video that spent way too long cleaning the outside with a baby wipe, then she proceeded to jam way too thick a piece of clay in to prove it was clean, oh the abuse!).  So I got started, and took a picture so I could make sure how it all went back together.  As I took the picture I thought hmm, I should really start thinking like a good blogger and document this better.  Truth is though that time was flying by and I figured a better web search than the 10 seconds I devoted would probably turn up better results than I could produce.

But for what it's worth, I'll share what I did.  Now, since I had no intention of taking apart my machine at that moment I didn't have any good grease to make this a real quality tune up, so consider this just the basics for rescue.

Here are the tools:
-Socket wrench, 10mm socket
-Phillips screwdriver
-Needle nose pliers (since the socket is too big to fit in the well of the foot, which you see removed above)
-Tongue depressor
-camera, helps to have a back up photo to reverse the process

(that metal thing on the right is the already removed foot and the hardware for it is scattered just to the left)


-See that screw the white arrow is pointing at? Take it off and you can wiggle that side panel off (crank side)


Look just above and you can see the foot still attached, those were the bits in the first picture. With the panel off you can get at the screws holding the foot on.  Those pliers are what I used to keep a hold of the nuts, on the underside, as I unscrewed from above.

Here's where you may find it helpful to snap a quick reference pic

It's helpful to have a good idea of how this all was together before it's in bits in front of you. Once you loosen and remove those nuts that panel can be taken off completely. Do this slowly, as the fenders, rollers, and scraper blades will all fall every direction if you just pull it straight off.

Now, here's where I was all surprised to notice that the scraper blades on this machine (Makin's) are actually plastic! My other machine, Amaco, they are metal and sharp. Having learnt my lesson on the old machine I had always had a delicate touch around these blades and I was shocked that I'd been so careful all this time and they really weren't sharp at all.  Anyways, let's get to the satisfying part, cleaning off those many layers of buildup.

Before
After!


Ah, so much better!

Be careful not to scratch or otherwise damage the blades with your cleaning.


Clean every other surface you can now reach with ease, I use 70% alcohol and baby wipes for this. Here's the tricky part that takes the biggest chunk of time. You have to hold everything together and try to line it all up simultaneously to pop the panel back on.  Inevitably as soon as you have most of it together something will fall out of place and you'll have to start again.  A spare set of hands would be really helpful for this stage.  There is one other way too where reassembly is easier and that's if you choose to leave off the fenders.  I have one machine set up like this and that machine is dedicated to just running thin sheets of translucent. Dedicating a machine means I never have to worry about little flavours of the past migrating onto my fresh new sheets.  But for this machine, my workhorse, I like to have my ShARK so I need to keep the fenders on.

So there you have it, a quick and dirty on reviving my mildly abused machine.  Now I really must get to some actual colour mixing.

Oh and Happy Mother's Day!

Wednesday 9 May 2012

Maybe getting somewhere, but oh so slowly!

Boy, listing on Etsy is a slow process for me.  I'm trying to be patient with myself, but I will be much happier when I get into the swing of it. I did manage to get my collection of squiggle beads listed.  They are so fun to make I'm excited to keep trying new colour combos.


There is a story that I think I've read about a million times at this point. You know, I can rhyme it off the top of my head as entertainment when waiting in line etc.  There is a mama and baby snake, who "wiggle with a squiggle", makes my daughter Averleigh smile and wiggle her hips, every single time.

If you're a toddler, Flip, Flap, Fly! is a must-read!

Thursday 3 May 2012

Getting Somewhere

I think I'm starting to get all my online ducks in a row.  Blog setup, new domain and email, new Flickr, new Facebook, new Etsy and I successfully switched over my Pinterest. Still quite a few kinks to work out and about a billion things to learn, but getting somewhere.


I was pretty happy with my last photo session for my planned etsy listings.  These guys above turned out so nice and the shame of it is that I really only have these six as they were a spontaneous type creation.  I'm sure I'll go for similar as I think they are really fun!